Put Apollo 11 in Your Pocket with SkySafari 6 – Space.com
Saturday, July 20, marked the 50th anniversary of humankind’s first steps upon another world. While we have not yet sent humans back to the moon and beyond, our computer technology has advanced to the point where our smartphones and tablets contain far more computing power than the Apollo 11 Lunar Module did. And our favorite mobile astronomy apps now put the Universe at our fingertips.
Just in time to celebrate Apollo 11’s historic moon mission, the popular SkySafari 6 app has been updated to include a wealth of Apollo-related content. In this edition of Mobile Astronomy, we put Apollo in your pocket. We’ll tell you how to add the new content and describe the ways you can use SkySafari 6 to learn about and re-live Apollo 11 and the other missions to the moon.
You can join Neil Armstrong and Buzz Aldrin at Tranquility Base, and view the realistically rendered Earth floating in the inky black sky overhead as they explored the moon. And we’ll tell you how to re-create how the moon looked in the night sky from anywhere on Earth when Neil Armstrong was taking his first steps on another world.
More coverage:
SkySafari as a space exploration simulator
In addition to being a scientifically accurate planetarium utility, the SkySafari app’s Orbit function has always offered the option to leave Earth and view space from a vantage point beside satellites, planets and stars. Now, that powerful graphics engine has been transformed into a virtual human space exploration simulator, with accurate three-dimensional representations of the Apollo spacecraft – including the Saturn V rocket, the Command Service Module and the Lunar Module.
Apollo Missions 8, 10, 11, 12, 13, 14, 15, 16, and 17, all flown by the Apollo astronauts between 1968 and 1972, have each been reproduced in exacting detail. For each mission, you can display and replay the spacecraft trajectories from Earth to the moon and back, all created from data published by NASA.
SkySafari’s easy-to-use time flow control panel lets you watch the events unfold in real time, in slow-motion, or at a faster rate. You can even pause time and fully appreciate the intricate ballet required for key mission milestones – because the graphics engine lets you interactively view the mission from any perspective. You can hover beside the spacecraft or roll them around, or pull away and view the mission from afar – displaying the trajectories taken by the Command Module and Lunar Module from Earth to the moon, down to the lunar surface, and safely back home.
Adding the Apollo Missions to SkySafari
The latest update to the SkySafari 6 app from Simulation Curriculum (for iOS and Android) includes a wealth of content designed to perfectly complement this week’s Apollo 11 celebrations. The Apollo Lunar Missions package is a free download for some Pro versions of the app and an inexpensive In-App purchase for the Basic and Plus versions.
Here’s how to add the new Apollo content to your SkySafari 6 app. With SkySafari 6 loaded and running on your device, tap the Settings icon in the Menu Bar and look for the In-App Purchases section of the page. (It’s at the top for iOS users, and at the bottom in Android.) Tapping that section will open a list of available extra modules. Select the Apollo Missions Data module and apply your usual payment method. Next, you’ll be prompted to download the content. It only takes a few moments.
When the download has completed, the message “View Missions” will appear. Let’s dive in.
Viewing the SkySafari Apollo missions
To explore the Apollo Missions, tap View Missions to open a page titled Apollo 11 Mission Milestones. It features hyperlinked headings and descriptions of key Apollo 11 mission events, listed in chronological order. Tapping a heading opens its 3D simulation.
The Mission Overview entry displays a nicely composed “bird’s-eye” view of the entire mission trajectory. (Links showing the mission trajectories for the other Apollo missions can be found at the bottom of the Mission Milestone page.)
The Launch into Earth Orbit simulation, Trans-lunar Injection, and six more mission milestones complete the astronauts’ journey through splashdown on Earth. You can start at the beginning, or jump into any stage.
Feel free to take control of SkySafari 6 to manipulate your view. Swipe your finger to rotate the spacecraft, or bring Earth or the moon into view. The distances from the spacecraft are designed to produce good views of the action. Pinch and zoom motions will allow you to move closer or farther from the scene. If you get lost, just tap your device’s Back button to return to the list of simulations, and start again.
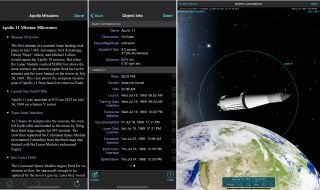
The Apollo Missions page lists the mission milestones in chronological order, plus a lead-off Mission Overview that shows the full mission trajectory. Tapping a title opens its simulation, as shown on the right. Using SkySafari’s Search function, you can summon Object Info for any of the missions and use the blue clock icons to navigate between through their events.
(Image credit: SkySafari App)
Most of the simulations will launch with time flowing faster than real time. Just sit back and watch events unfold. Don’t fret if the spacecraft disappears for a period of time. It has simply entered Earth’s (or the moon’s) shadow, and will soon reappear! When you are ready to move on to the next scene, return to the list and select another milestone.
To join Neil and Buzz on the lunar surface at Tranquility Base, select the milestone titled On the Moon. The app’s photographic panorama of the Apollo 11 landing site and the star-studded, inky black sky overhead will enhance your feeling of being there. Swipe your finger to look around. Can you find the Earth? If you alter the time, you’ll see that Earth stays in the same spot while everything else shifts position. That’s because the moon is tidally locked to Earth – keeping the same face towards us at all times.

SkySafari includes a 360-degree panorama of the Apollo 11 landing site, allowing you to re-create the star-filled, black sky that Neil Armstrong and Buzz Aldrin worked under. You can drag the view around to find Earth sitting overhead. The enlarged view of Earth (right panel) from the same moment in time reveals the city lights of the USA and Canada, where countless space enthusiasts watched live the video being broadcast from the moon.
(Image credit: SkySafari App)
Exploring the other Apollo missions
Accessing the full content for the other Apollo missions is best done via the app’s Search Menu. (In the Basic version of SkySafari 6, an Apollo Lunar Module icon shortcut has been added to the Toolbar.) If you haven’t already done so, exit of the Mission Milestones page and return to the main sky display.
Tap the Search icon on the Toolbar and type “Apollo” into the Search Bar. A long list of entries will appear, including the Apollo moon missions, plus assorted asteroids and lunar craters. You’ll notice that some missions have multiple entries. That’s because the Command Modules and the Lunar Modules went to separate destinations! Select a mission and tap to open it.
The layout of the Object Info page for the selected mission uses the same format used for celestial objects, starting with Basic Information at the top. Look through the list of mission milestones listed chronologically in the Visibility section and tap its clock icon to open that event. Or swipe right to open the Data page, which features descriptive text and a selection of photographs.
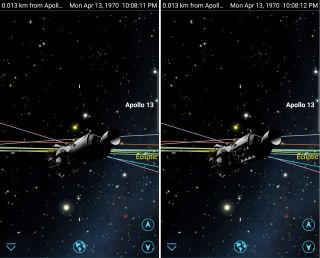
Sit back and watch events unfold in the app – or use SkySafari’s time flow controls to pause, rewind, or change the speed of the action. These two frames show the spacecraft before and after Apollo 13’s catastrophic Cryotank explosion, which occurred on Monday, April 13, 1970 at 10:08:11 pm Eastern Time.
(Image credit: SkySafari App)
The initial view will show a view of the sky with the selected spacecraft as a labelled point. To view the simulation up close, tap the Selection icon and choose Orbit Object. To manipulate time, open the Time Flow control panel. For most simulations, setting the time increment to minutes and flowing time forward continuously works well. I enjoyed viewing the Cryo Tank Explosion from Apollo 13. The appearance of the Command Module will change after the explosion occurs at 10:08:11 pm Eastern Daylight Time (or 02:08:11 Greenwich Mean Time).
To select another mission milestone, return to the Object Info page by tapping the Selection icon and choosing Object Info. To exit the 3D simulation and return the app to normal operations, tap the Earth icon and tap Now in the Time Control Panel.
Recreating the sky on July 20, 1969
For some, Apollo 11 is a fond, but distant memory of gathering around the black and white TV watching grainy video of Neil Armstrong descending the ladder of the Lunar Excursion Module and stepping onto the moon. If you’re part of the over-fifty crowd, perhaps you dashed outside and looked up at the moon. Do you recall what phase it was showing?
Here is how to use the SkySafari app to recreate the night sky for July 20, 1969. When you launch the app, it will display the sky at your location for the current time and date. (Those are both displayed at the top edge of the display.) Tap the Clock icon in the toolbar at the bottom of the screen to reveal the time control panel. With this tool, you can alter the date and time, and control the rate that time is flowing in the app.
Below the date and time values you’ll see two pairs of arrows, and the word “Now”. To change the date, tap the year and it will become underlined. Tap the innermost left and right arrows to set the year to 1969. The month is already showing July. Tap the date and change it to 20. (The day of the week will update automatically.)
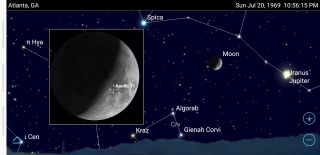
To see how the moon looked from any location on Earth at the moment when humans were taking their first steps on the moon, set the app to July 20, 1969 at 10:56:15 pm EDT (July 21, 1969 at 02:56:15 Greenwich Mean Time) and choose a location. For observers in the eastern USA and Canada, the moon was setting. But for those located in the southern and western parts of the country, the moon was higher in the sky. Inset: The app allows you to magnify objects and to add labels for features on the moon, including space missions.
(Image credit: SkySafari App)
Next, we need to set the app to the time when Neil Armstrong took his first steps, which was 02:56:15 Greenwich Mean Time (GMT). This was equivalent to 10:56:15 p.m. Eastern Daylight time and 7:56:15 p.m. Pacific Daylight Time. (If you live in a different time zone, simply add or subtract from GMT the appropriate number of hours for your location.)
The app will now be displaying the historic sky for your current position on Earth. If you want to view the sky from another location, tap the Settings icon, and then tap the Location option. To look up a location, tap Choose Location From List, type all or part of a place name into the Search bar, and then tap the Search icon. Select your choice from the list that appears. Another option is to scroll through the alphabetical list of countries and tap one. Then scroll through the list of cities/towns to find yours. You can also open the map and drop a pin anywhere on Earth.
For locations in eastern USA and Canada, the moon was close to setting in the west when Neil was making history. If the moon is hidden by the terrain in your horizon panorama at that time, wind back to a slightly earlier time of the evening. Or select another horizon panorama under Settings / Horizon & Sky, or choose Translucent Area. When everything is set, drag the moon into the center of the display and enlarge it. Now you can see how the moon looked to humanity on that date. I won’t spoil the surprise!
Space.com and Simulation Curriculum have joined forces to create a fun Apollo 11 Widget that you can access here. When you open the page, you’ll see a “real-time” (that is, the current time and date – but 50 years in the past) view of Apollo 11. Three dimensionally rendered spacecraft appear on the left panel, and an overview of the mission trajectory from Earth to the moon and back is shown in the right panel. The displayed mission date and time are displayed at top left. You can open the page from time to time to see the mission unfold, or just let it play out in a desktop window!
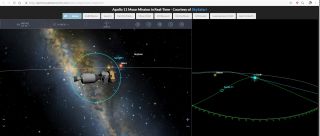
Space.com and Simulation Curriculum have joined forces to create a fun online Apollo 11 Widget. You can re-live history by starting the mission at launch on the morning of July 16, and allowing time to pass in real time. Or use the tabs to jump into pre-determined mission milestones. Tools allow you to manipulate the view of the spacecraft and the flow of time.
(Image credit: SkySafari App)
Tabs across the top of the screen offer different ways to view the Apollo 11 mission. The Full Mission tab replays the mission from launch to splashdown in a compressed time frame. The default is 300 times reality, but you can click on the time control to change the multiplier. You can also pause and rewind the flow of time.
Other tabs take you to specific mission stages. Drag your mouse around to view the action from other perspectives, and zoom in or out. It’s a lot of fun!
SkySafari 6 will provide you with hours of fun and plenty of interesting Apollo 11 content. Once you’ve explored the other eight Apollo missions, have a look at the more recent Galileo mission to Jupiter, Cassini/Huygens to Saturn, and New Horizons at Pluto and beyond!
Simulation Curriculum is also running an Apollo 11-themed contest in association with Celestron and Space.com. Visit the Apollo 11 widget link, answer the questions, and enter your email address for a chance to win moon-related prizes. Good luck! And Happy Anniversary, Apollo 11!
Editor’s note: Chris Vaughan is an astronomy public outreach and education specialist at AstroGeo, a member of the Royal Astronomical Society of Canada, and an operator of the historic 74-inch (1.88-meter) David Dunlap Observatory telescope. You can reach him via email, and follow him on Twitter @astrogeoguy, as well as on Facebook and Tumblr.
Follow SkySafari on Twitter @SkySafariAstro. Follow us @Spacedotcom and Facebook.


